CSE Software Development Standards
Scrum Board
User Stories
You will need to create a card in your scrum board for each user story. Each user story card documents exactly 1 potential feature in your program. Below is an example of a user story and then an explanation of each of the required elements.
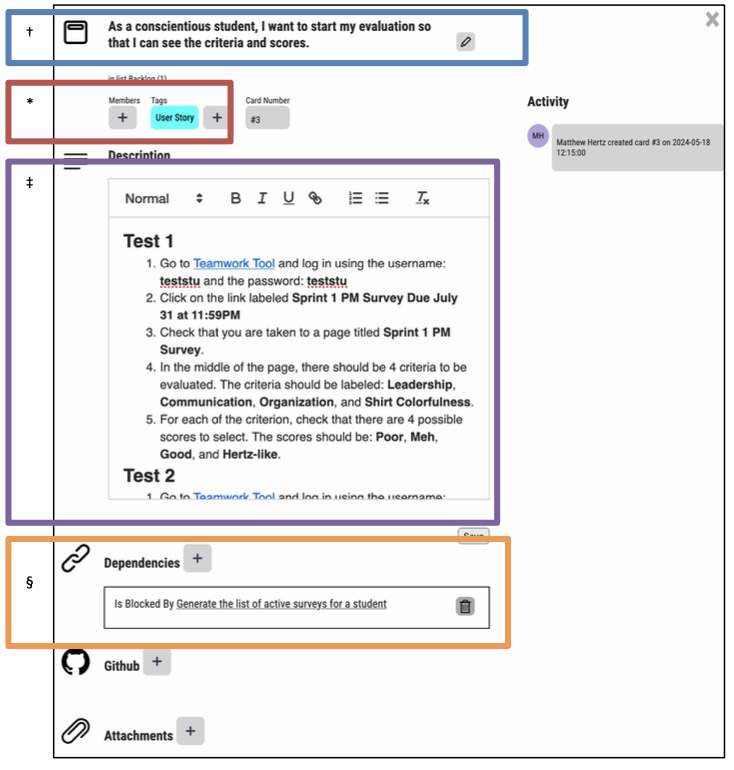
† (title) contains the user story text. It should only contain the text of the user story. The text must follow the user story template: "As a role, I want action so that observable outcome". The role provides insight as to why this feature is important, the action describes what the role does to start this feature, and the observable outcome describes what the role will see or hear to "know" the feature worked. (The only exception to this policy will be the sprint 1 user story that is blocked by wireframing, research, and proof-of-concept tasks. That user story has "an interested investor" as its role and "beginning the walkthrough" as its action.)
* (tags) the User Story tag should be added to the card when the card is created. The current sprint should be added as a tag when the story is moved to the Planned list. Ideally stories will be completed in the sprint in which it is started, but this is not mandatory. When a story cannot be completed by the end of the sprint, it should carry over to the next sprint. In these cases, do NOT remove the original sprint tag, but instead have the card include tags from the original sprint and the new sprint.
‡ (description) contains all of the acceptance tests for the story. All of the acceptance tests needed for this story should be written in the description area. Each acceptance test must be labeled and then followed by a numbered list of steps to take. Add a blank line between each of the tests. The steps must specify every input that needs to be entered and, for the steps being implemented or updated by this feature, the exact results the user will witness. These tests will be run by an untrained user, so cannot include jargon nor include technical details.
§ (dependencies) Each user story Is Blocked By all of the tasks that were created to implement the story. User stories need to have at least 1 (and almost always more than 1) task as a dependency. User stories never block other user stories nor do they block tasks.
(Not shown in this image) Comments can be added in the activity portion of the card to provide updates on this user story.
Tasks
Each task should also be created as a card on the scrum board. Below is an image on an example task and this is followed by an explanation of the required elements.
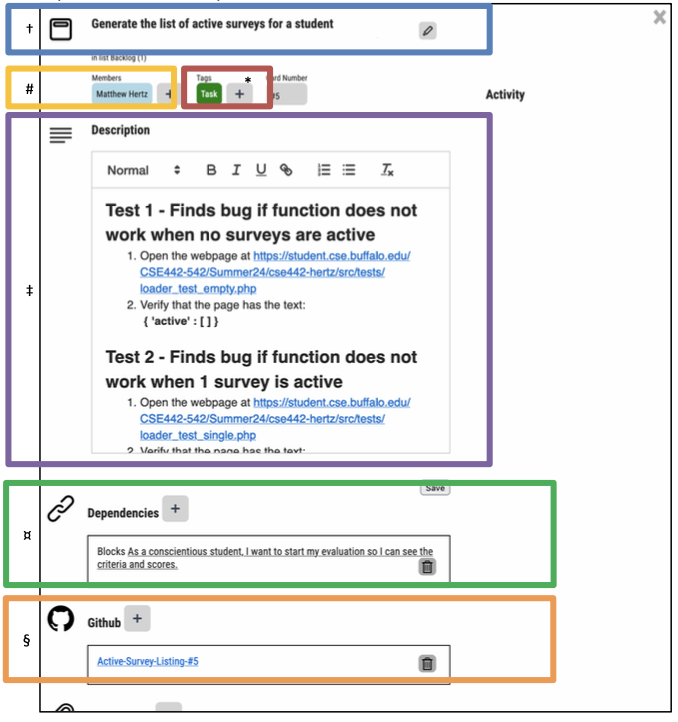
† (title) contains a brief summary of the task. It should only contain a summary of the task. There is no required template to follow and technical language is acceptable. The title should summarize the work in a way that could be understood by a new-to-the-project developer.
# (members) specifies the student(s) responsible for completing this task. These assignments are usually made by the PM. Student(s) should add themselves in the member area of every task they were assigned by the PM immediately after the meeting. Students can choose to complete additional tasks by adding themselves in the member area, but only if those tasks are in the Planned list and are not assigned to anyone else. Removing a student from the member area or adding additional students to the member area is very rare and only by specific instruction of the PM.
* (tags) should identify this card as containing a task. The specific tags used for tasks will vary by course, but at no time should there be more than 1 type of task tag. The current sprint should be added as a tag when a task is moved or added to the Planned list. Ideally tasks will be completed in the sprint in which it is started, but this is not required. When a task cannot be completed by the end of the sprint, it will usually carry over to the next sprint. In these cases, do NOT remove the original sprint tag, but instead have the card include tags from the original sprint and the new sprint.
‡ (description) contains all of the task tests for the story. Each task test must be labeled with the bug it identifies and there should be a blank line between each test. If unit tests are being used, list the file name(s) where the tests are found. If the task tests use step-by-step instructions, each step should be numbered, all inputs should be specified, and the exact outcome of each step updated or implemented by this task must be stated. If a task test requires a file for input, the file's location in the repo needs to be specified. Task tests are how we validate work was done correctly and where debugging work begins. While exhaustive testing is rarely useful, task tests need to cover all of the edge cases. These tests will be run by a developer, so jargon and technical details are expected.
¤ (dependencies) Each task Blocks exactly 1 user story. Each task blocks the user story it was created to help implement. It is rare that a task is needed to implement multiple user stories, but when that happens the task should block the user story that is likely to be completed first. Tasks are never blocked by other tasks nor are they blocked by a user story.
§ (github) links to the branch off of dev which was created for this task and any pull requests which merge changes back to dev. Only a tasks which creates, updates, or deletes file(s) should get a branch. That branch must be created the first time the card is moved to the In Progress list. A pull request is required only when the task has a branch and the card is moved to the Completed list.
(Not shown in this image) When you run into issues that might prevent your completing the task, you MUST use comments to document your efforts. Comments specifying the specific issues or errors that occurred, the web search(es) you performed to resolve the problem, the URL and summary of each website(s) you used, and any new or different errors you then receive. Only if the comments document you spent the expected time productively working to resolve these bugs, can PMs and/or your instructor mark you as prepared despite work not being completed.
Lists in the Scrum Board
The lists will already be setup for you in the scrum board in the PMTool. The name of each list and order that they should appear on your scrum board will match those in the image below:

† (Backlog) Contains cards for any user stories and tasks that have been created but not yet included in a sprints. Because it is important to capture ideas as we have them, we can create new cards in the Backlog at any time. This also means that cards in the Backlog do not have to be complete or correct. As ideas are fleshed out, cards in the Backlog should be fixed and tests added or modified. Cards should only be moved into the Backlog from the Planned list. This is not a common occurrence and, if it is needed, should happen only immediately after sprint grading has completed.
‡ (Planned) User stories should have a full set of acceptance tests and task cards should have convincing task tests before they are added to the Planned list. At the start of each sprint, all of the cards which the team intends to complete in the current sprint that are in the Backlog should be moved into the Planned list. Cards must include the current sprint tag added to them when they are added to the Planned list. Cards should NEVER be moved from Planned to Backlog in the middle of a sprint.
* (In Progress) The first step to take when working on a card is to move the card into the In Progress list. When moving task cards into the In Progress list, all the individual(s) assigned to work on the card should be listed as members. If the card is for a task that will create, update, or delete files, the card should also have added the link to the branch created for it. User stories and tasks must have a complete set of test cases when moved into the In Progress list. Cards should never be moved from the In Progress list back to the Planned list or Backlog.
# (Testing) Cards are moved to the Testing list when it is ready to have its task tests or acceptance tests run. Once all its tests pass, cards should be moved to the Completed list. This is a very important step documenting that someone actually ran all of the tests and saw that they passed. If 1 or more tests fail, the card should be moved back to the In Progress list and the bugs should be fixed.
¤ (Complete) Cards are moved to the Complete list only after running and passing all of the card's acceptance tests or task tests. If a bug is found involving a card in the Complete list, the card should be moved back to the In Progress list, gain test(s) which will pass only after the bug is fixed, and have developers use the existing branches for debugging work.
§ (Closed) Typically only the PM will move cards from the Completed list to the Closed list. In very special circumstances, the PM may request that the team do this just prior to the end of a sprint. If a bug is found involving a card in the Closed list, the card should be moved back to the In Progress list, gain test(s) which will pass only after the bug is fixed, and have developers use the existing branches for debugging work.
Github
Branches in Github
At the start of your project, you will need to create a dev branch off of the main branch. Your project's main branch is used to hold the latest release of your project. The current sprint's completed tasks will be added to the dev branch. AT NO TIME SHOULD YOU EVER MAKE A COMMIT DIRECTLY TO THE main OR dev BRANCHES.
It is important that your main branch contains all of the code and documents that has been "released" to your client. The dev branch contains all of the code and documents from tasks which have been completed and tested. At the end of each sprint, your PM "releases" a new version of your project by creating and approving a pull request merging the dev branch into the main branch.
When starting work on a task that will create, update, or delete files, you must create a new branch for the task from the dev branch. The new branch's name must contain the task's card number and a description of the work the task will implement. This allows your manager, your manager's manager, and other outsiders to understand the work you are doing and why you are doing it. Making regular commits in this branch documents your progress for your manager, insures others can follow your thought process in this work, and limits information loss due to a power outage or lottery win. Do NOT wait to finish your code before committing – broken code cannot harm anyone else since they will be working on different branches. Once your work is complete and passes all of the task tests, move the task card to the “Completed” list and use a pull request to merge the branch back into the dev branch. If a bug is later found in the branch, you will need to fix the code and use a second pull request to merge the updated code back into the dev branch.
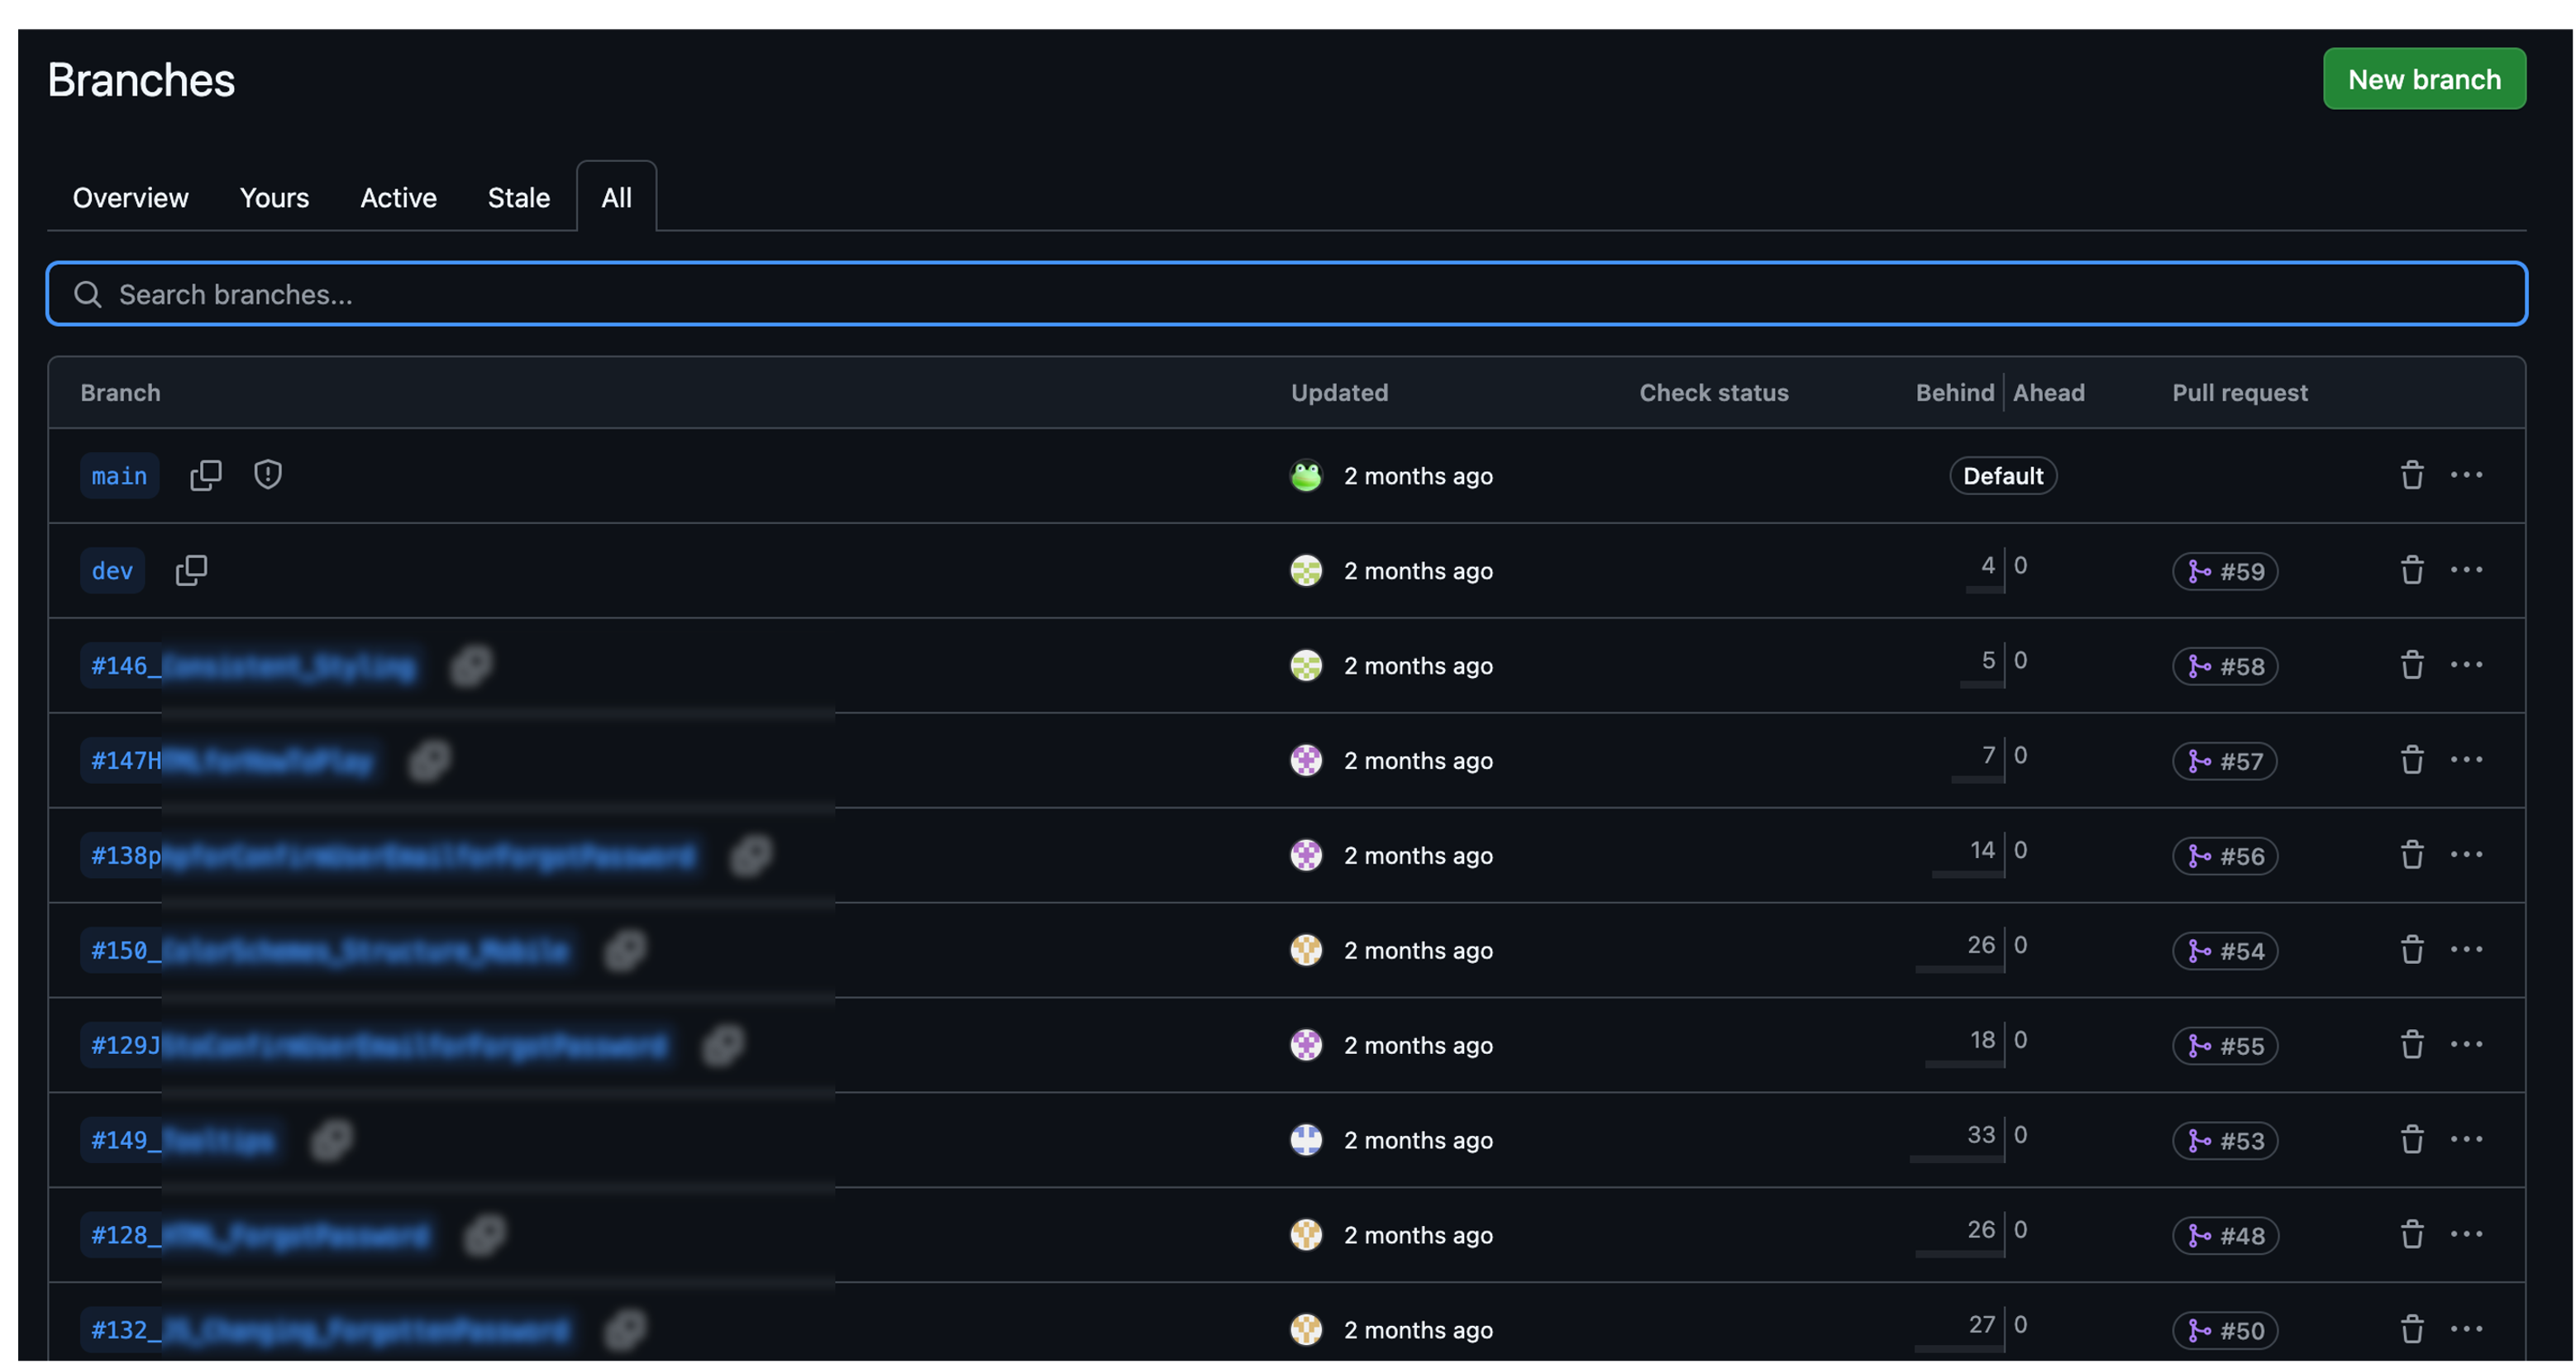
The history of branches and commits can be seen in GitHub by first selecting View All Branches from the branch dropdown on the home page and then selecting the All tab on the Branches page. An example of a good use of branches can be seen below:
Commits in Github
It is expected that students will make regular commits as they are working on a file. In addition to ensuring progress gets saved, regular commits allow others to recreate their process and understand the decisions they made while coding. Frequently pushing changes to the server (and pulling down any updates) also keeps merge conflicts to a minimum and simplifies the cleanup process when conflicts occurs.
Below is an image showing a sample commit using the GitHub web interface. Using the web interface is NOT recommended, but it is shown here to provide a clear example illustrating these standards:

† (subject) The first line of the message should be at most 50 characters and give a brief overview of why the commit matters. Since you are working on 1 task at a time and are making frequent commits, the commit should contain work for 1 task and be made in that task's branch. Remember that the primary audience for these commit messages are current and future developers on this project who are trying to understand the thought process behind this code. The secondary audience for commit messages are your boss and managers who use this to review your progress. Messages must focus on the information needed those audience need to understand your work process on this task.
‡ (description) Messages can contain additional lines if more explanation is needed than in the subject. If the commit breaks existing code or has any important side-effects, document those effects here and explain why these changes are important. The description should also focus on the information that other developers and managers need to understand your process while working on the task.